|
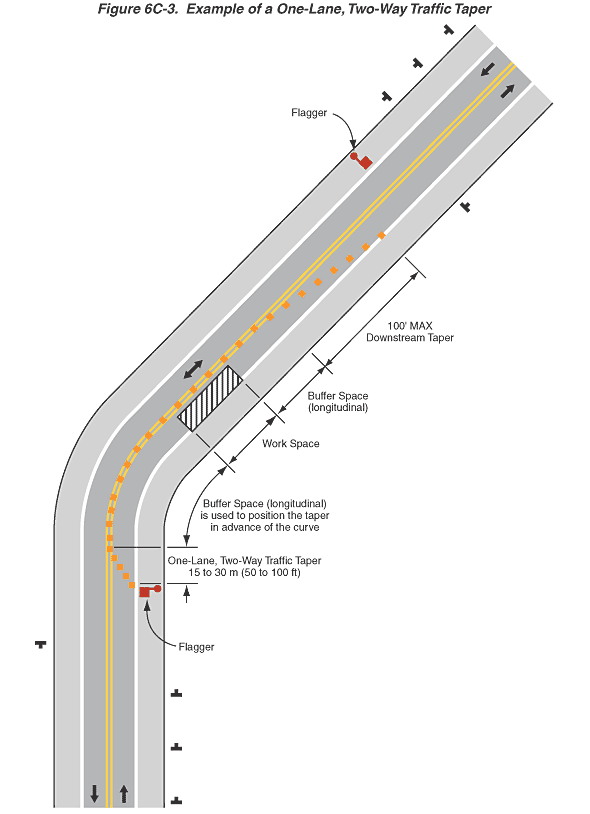
Figure 6C-3. Example of a One-Lane, Two-Way Traffic Taper
This figure illustrates an example of a one-lane, two-way traffic
taper.
A vertical two-lane roadway is shown, which then is shown curving
to the right and then continuing in a straight line, diagonally
upward and to the right. At the bottom of the figure, a black arrow
is shown in each lane denoting the direction of travel. One arrow
is pointing upward, and another is pointing downward. A shoulder
is shown on each side of the roadway, and a solid white line is
shown separating each of the shoulders from the adjacent travel
lane. A double yellow line is shown separating the two travel lanes.
Starting from the bottom of the figure, traveling upward (northbound)
to the right of the shoulder, three upside-down T-shaped symbols
representing sign locations are shown equally spaced.
About one-third up from the bottom of the figure, a red flag symbol
labeled "Flagger" is shown on the right shoulder. Where
the flagger is located and extending to the start of the roadway's
curve to the right, a longitudinal section of the road is shown
labeled "One-Lane, Two-Way Traffic Taper" and accompanied
by the notation "15 to 30 m (50 to 100 ft)." In this section
of the roadway, starting at the white line separating the shoulder
from the right lane, a series of orange squares equally spaced denoting
channelizing devices are shown tapering in to the double yellow
line.
Directly above this area and extending to the end of the curved
section of road, a longitudinal section of road is shown that is
labeled "Buffer Space (longitudinal) is used to position the
taper in advance of the curve." In this area, the orange squares
representing channelizing devices are shown to continue along the
center of the double yellow line.
Directly above this space, beyond the curve and extending along
the subsequent straight section of road, an area is shown labeled
"Work Space." In this area, a rectangular black and white
diagonally striped box is shown occupying the right lane. The orange
squares representing channelizing devices are shown to continue
along the center of the double yellow line for a short way above
the work space. Adjacent to the work space, a double-headed black
arrow is shown in the southbound lane, denoting two-way traffic
in that lane.
Directly above this space, along the straight section of road,
an area is shown labeled "Buffer Space (longitudinal)."
In this area, the orange squares representing channelizing devices
are shown to continue along the center of the double yellow line.
Directly beyond this area, along the straight section of road,
an area is shown labeled "100' MAX Downstream Taper."
In this section of the roadway, starting at the double yellow line,
a series of orange squares equally spaced denoting channelizing
devices are shown tapering out to the white line separating the
shoulder from the right lane.
Near the top of the figure, a symbol is shown to the right of the
northbound shoulder, signifying a sign location.
Starting from the top of the figure and traveling downward (southbound
lane) to the right of the shoulder, three symbols representing sign
locations are shown equally spaced, the last one opposite the one
to the right of the northbound shoulder. About one-fourth from the
top of the figure, a red flag symbol labeled "Flagger"
is shown on the shoulder just in advance of the last of the channelizing
devices along the northbound white shoulder line. Farther south
in the southbound lane and just below the flagger in the northbound
shoulder, a symbol is shown to the right of the southbound shoulder,
signifying a sign location.
Back
to Chapter 6C
|
